I have been fascinated with impossible places. Things like the Doctor Who Tardis, Hypercubes, and M.C. Escher’s impossible objects, lead me to happy daydreams. Lately I have been wondering, would it be possible to create some of these physically impossible spaces. Could I create them in Virtual Reality (VR), and if so, what would they feel like?
Disclaimer
This is not a FileMaker post. Most of you, familiar with me, know that I normally work with FileMaker supporting and developing solutions. This is a post about VR. I am really excited about the potential of VR and what it will do for data visualization. Perhaps no one has figured out what it will look like when it leaves the flat screen, but I want to be there to watch it grow.
I have been waiting since the early 90’s, and it seem’s the Virtual Reality we expected is finally here. It took a long time. The good part about it coming this late to the party, is that the tools needed to create and build detailed environments have already been well established for the computer gaming industry. With both the hardware and the software tools now available, there is a huge push for creativity. Like the boom of desktop publishing in the 90’s, there is now a boom to build 3D worlds, games, and experiences. The HTC Vive and Oculus Rift made their debut this past year, and with their full immersion capability, the opportunity to explore impossible places through augmented and virtual reality has suddenly become possible.
The Project
As I get familiar with the tools and how to build things in VR, I have a number of ideas I want to bring to life. The first idea, in a list I would like to embark on, is to create a room with four archways. The impossible part is to have each archway open into a different world. I would like the room to feel open and if you were to peer around the corner through a given archway, the world on the other side of that archway would contradict the view from the opposite side. When viewed in VR the contradiction would be obvious. In today’s blog I will go over my process for creating an Impossible Space in Virtual Reality. I was really happy with the result, but it also brought about some interesting observations. Feel free to view the result, and come back to read about the process I used.
Tools and Hardware
The development tools and engines that assist with all of the complex processes of modeling, rendering, physics, and piecing scenes together are easily accessible. The front runners at the time of this writing are Unity and Unreal Engine. Both are game development platforms that allow developers to build 3D games for almost any platform/operating system. They are designed to make very powerfull games and to do it efficiently. As such, they make it very easy to take a basic concept and build an experience in VR. For this adventure I chose to use Unity. It’s the game engine I am most familiar with and it is currently free.
The hardware is a bit expensive. As a developer I have been eager to embrace the new medium of VR. I have happily invested a small fortune on hardware to begin the journey. Last year I purchased an HTC Vive ( $800 ) and built the high-end gaming machine needed to power it ( $900-$1200 without graphics card ). It consists mostly of a Windows machine dedicated to a graphics card. The high-midrange graphics card that I purchased for VR is the Nvidia GTX 980 Ti ( $600 ). It has been a great card and works really well for VR.
Getting proper game physics and having the ability to interact with the environment is important. Most desktop games would use a keyboard, mouse or gamepad. Currently for VR those peripherals are difficult to interact with while in VR. This is because they are not tracked and you can’t see them. Depending on the headset you choose, they currently come with special handheld controllers that allow you to interact with the virtual world. The controllers are tracked in 3D space and you can see them in the game. In order to use these controllers in VR, you need to map functions of what touching and clicking things with the game controllers do. This was a huge hurdle initially, but there have been some great toolkits created for Unity to take care of this. There are two top contenders that make this easy. Newton VR ( by Tomorrow Today Labs based in Seattle ) and VRTK ( VR Toolkit ). I haven’t had the pleasure of working with Newton VR, but I have met many of their team and they are some smart developers. I have played several games that use it and they work great. The one I am most familiar with and I have used since it’s inception is VRTK. I highly recommend it, but my bias on why I liked it so much is mostly that I haven’t tried Newton VR. Both/either of these toolkits make connecting interaction with the game environment possible.
Challenges
After getting familiar with building things in Unity, one of the technical challenges for this project involved transitions from one place to another. In order to pull off a transition from one world to another, I was pretty sure I could use something similar to a portal. A portal is a doorway (or gateway) that links two places in space. In order to get started I needed a working portal in Virtual Reality. I began looking at some of the techniques for creating portals. The kind of portal I had hoped for, would allow me to see the world on the other side of the archway and also allow me to seamlessly walk into it. This is where it got a little tough.
The idea of portals is not a new concept and has been pretty well explored in the video game industry. This was mostly due to a game by the name of “Portal” that involved shooting portals, from non other than a portal gun. You would shoot portals on walls and the floor, then your character would enjoy jumping through those portals to get from one location to the next. As such, there is a plethora of tutorials to help create the camera effects needed to mimic this incredible game mechanic. YouTube is a great resource, and there are several tutorials for Unity, created by users, that show how to emulate this behavior for desktop games.
I started the scene by laying out a test platform to mount the portals on. However, when converting these portals for the binocular vision found in VR, I found a critical flaw. The current process for creating portals, only used one camera. Unfortunately, I quickly realized, I needed a way to render two cameras. Using two cameras for a portal is not very common and originally hadn’t been thoroughly explored.
For a 3D game, on a single monitor (2D screen), you only need one camera at a time. When rendering for Virtual Reality, if you want to make it feel real, you need two cameras. One for each eye. The cameras need to be the same orientation and distance apart as human eyes, and have a similar focal length. This is what they call stereo rendering. The idea is that you need to render a separate frame from each camera at the same vantage point as each eye, and pass it to the display of each eye in the VR headset.
The next part gets even trickier. A portal is similar to a distant reflection. In order to have a proper reflection (or mirror), you also need to maintain this stereo rendering. Each eye looks into a mirror and sees a slightly different offset perspective. In order to do this in VR they use some tricks to make it more efficient. You project the stereo rendered view from the reflected position and display it where the mirror is located. Essentially, you point a camera out from behind the mirror, but at the angle of reflection, then project this image where the mirror surface is located. It too is rendered for each eye. It sounds confusing, but the mirror is just a display, showing the camera view from the vantage point of the reflection.
When viewing the scene in a VR headset, if you don’t use proper stereo rendering, reflections appear distorted. This is because, if you use a single camera to show the reflection view, the same image is projected into each eye from the same spot in space. Your brain doesn’t like your eyes existing in the same space and when there is no binocular disparity, it responds with discomfort. You can close one eye, but then, the rest of the depth effect is lost, as you are no longer using stereo vision.
Another problem with stereo rendering is that in order to have more than one mirror, or portal/archway, you need to do multiple stereo rendering cameras. This is because each portal/archway is a projection from a different camera. To do multiple instances of stereo rendering also requires a lot of processing power. Most mirrored surfaces you see in video games would suffer from a double image reflection when viewed from a stereoscopic camera rig because, of course, they were initially intended for a single camera. When you start to add multiple reflections for stereo rendering, things like rippling lake water and mirrors on a wall get a lot more complex. You basically start to render the scene twice for every reflection, and in complex environments this becomes highly taxing on the graphics card. The result is that, either quality or frame rate will suffer. This is made worse with the compounding of each additional reflection added.
Initially, I felt a little defeated with several of the portal rendering techniques since they were designed for single camera views and were not working for stereo vision. This isn’t to say I hadn’t been able to get mirrors to work in VR before, I previously had found a nice shader that did a great job of rendering mirrors. What is a shader? Shaders are a program that is used to provide shading and special effects. Shaders calculate rendering effects on graphics hardware with a high degree of flexibility. Unfortunately that shader had been broken with some of the recent updates.
Solution
Valve released a Stereo Rendering Toolkit on the Unity Asset store in late 2016, but it initially wasn’t working very well. Probably for similar reasons as my old shader. I had nearly given up, then in early 2017 Vive came out with an update to their Stereo Rendering Toolkit. The update had addressed many of the breaking changes that were affecting the other shader as well. This toolkit solved most of the heavy lifting involved in stereo rendering. Having a community that is actively building solutions to these types of problems is of great value.
Laying out the Scene
After downloading the Vive Stereo Rendering Toolkit, I began playing with it. I spent a few hours toying with the demos provided in the toolkit. I worked out some test scenes with a single portal. Now that the heavy lifting was out of the way, things were going well, and it wasn’t long before I started mapping out how many portal walls I would need.
How would you go about making four walls that allow you to walk into four different worlds? The solution I came up with, given the nature of the way portals work, involved twelve portal walls. There would be four separate platforms, and each platform would have a room with three walls. The fourth wall on each platform would actually just be an opening into the platform in which the room existed. Each of those three walls would display the stereo render from each perspective view of the platform they linked to. If you pass through one of those walls, you go through what is called a transform and your position changes to the desired position which is on one of the other platform’s. From there you see the walls in that location.
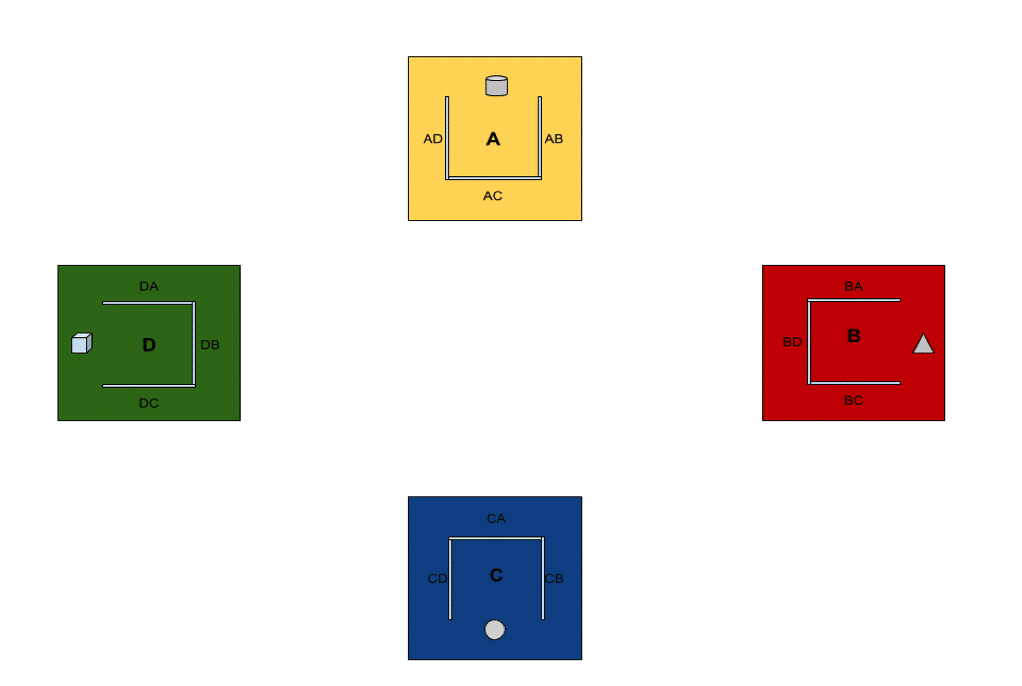
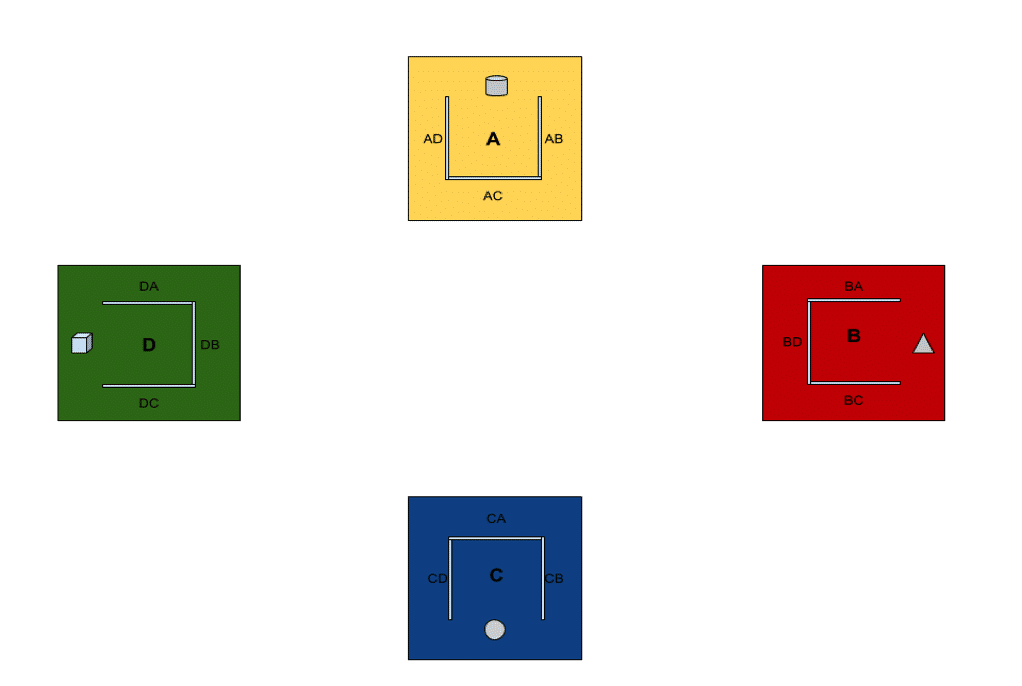
Here is a mock up of a top down view that I had worked out. In this test scene I created four platforms. Each is a different color, and each has one shape. On each of the platforms are three walls that look through to their corresponding wall on each of the other platforms. When you stand in the center of any of the four rooms you can turn your head around and see all four shapes. If you stand at the position “A” and look out towards the “AC” wall, you see, projected on the “AC” wall, the camera view from the “C” location that matches your orientation at “A”. If you step through the “AC” wall you are teleported to the exact same position in “C” and if it works correctly you don’t notice a change.
Other than the stereo rendering camera mechanics, the scene consisted of mainly laying out the platforms, archway’s, and camera locations. Each one had to be placed carefully in order to be aligned properly. After mocking it up on paper I was ready to take it into Unity. The total number of portals I needed ended up being 12, that coupled with the main camera made 13. It took some time to position the cameras correctly, but within the course of an evening, I had a working test scene. I was surprised at how well Unity worked for this type of design. Here’s a video of it.
The test was a success. The next step: to actually create the four worlds. I decided that I had enough processing power that I could separate the worlds and give each platform it’s own environment. I found a nice low poly asset with painted nature scenes on what is called the Unity Asset Store. The Asset store is a place you can purchase models, animations, and various assets to assist with developing a game. I chose assets that hopefully wouldn’t over tax the graphics card. At the time of this writing it cost roughly $30.
It had three environments prebuilt: Summer, Winter, and Fall. I placed one in each world and then added what is called a skybox of some clouds to the fourth world. I had to make some adjustments to the layout, since the environments were bigger I had to space things out. They had to be very far away from each other. While the distance didn’t matter to the transforms, it helped isolate audio sounds and visual effects from bleeding over into each other. This was done via a technique in Unity called Occlusion Culling. Occlusion Culling is a feature that disables rendering of objects when they are not currently seen by the camera because they are obscured (occluded) by other objects or by distance. After playing with the lighting and turning off some of the particle effects, I was able to mildly achieve what I had been looking for. It turned out pretty interesting and the frame rate was maintainable.
In this scene you see Summer, Winter, Fall, and sky. I added some sounds for each world. I also added some critters. There are butterflies in the summer, crows in the winter, and leaves in the fall. The open sky has seagulls. (These came from another asset called Bird Flocks bundle)
From the center of any of the rooms you can peer out into all four worlds. If you step into each world you can explore them as immersive space. It is only when you walk around to the backside of a wall, you will notice there is no wall present and the illusion of an open room is maintained.
I did find that having all thirteen stereo camera’s active in the scene could take a toll on frame rate. I played with it a little bit more and optimized it in order to have only four camera’s active at any given time. Why four? One stereo camera was needed for the player. That is the eyes you (as a player) look through in the scene. The other three were for the three walls looking into the other worlds. These cameras were located in each of the corresponding worlds. Each wall acted as a 3D screen that would show the projection of those cameras. Each stereo camera moved just like the player in all four worlds at once. If you stepped into the archway you would teleport to the other location. The three active cameras would switch off, and a different set of three cameras would switch on for the new location. It would happen between frame draws, fast enough you wouldn’t notice, and it ended up working pretty well as long as I didn’t go too crazy with particle effects. This optimization to three cameras was much better than the original twelve since the extra eight stereo cameras were not visible at any given time.
Conclusion
Initially, when I thought about making something like this, I was under the impression it would be mind bending to experience. I tried to imagine how the view would change as you put your head around a corner into winter and then back on the other side to summer, two seasons that can never exist next to each other. It was difficult to grasp. But, it turns out, looking and walking through portals into different worlds feels pretty natural and my brain didn’t have any trouble with it. Maybe when actually experiencing it, your brain just accepts it. Maybe humans are pre-wired for interdimensional movement and we need to reevaluate the way we look at physical space. All in all, it was a fun experience to build and I learned a lot going through the process.