
We release new versions of our FileMaker add-ons periodically, such as our PBS Log which you can find in the Claris Marketplace. Here we explain how to update an existing add-on while protecting your data. The update process requires youto delete the currently installed version of the add-on, but there are a few steps to take first to ensure your data and scripts are preserved.
Steps to Take to Update an Existing FileMaker Add-on
Before removing the add-on, follow these steps.
- Create a backup of your solution in case of errors
- Go to Add-On layout
- Depending on file size and table count of add-on, export all of the add-on’s records as a merge file to retain field names, or you can use the backup for importing in step 10.
- If customizations were made to the add-on’s scripts, rename the add-on’s script folder so it doesn’t get deleted.
Removing the Add-On
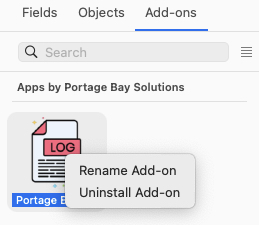
Now you are ready to remove the original add-on.
- Enter layout mode From the left menu panel, switch to the Add-On tab an right click on the add-on you want to remove. Select Uninstall Add-On… Then enable delete all tables, fields, and record data.
- Access the AddonModules folder on your computer and delete the folder of the add-on you removed. The folder can be found:
- Mac: ~/Library/Application\ Support/FileMaker/Extensions/AddonModules/Add-On/
- Win: ~\AppData\Local\FileMaker\Extensions\AddonModules\Add-On\
- Place the updated Add-On folder in same directory.
- Restart FileMaker.
- Add the updated Add-On to your solution.
- Import the original add-on records.
- If customizations were made to the original add-on’s scripts, copy them into the updated add-on’s scripts folder.
- Update all the “perform script” steps calling the original scripts to use the updated scripts, including the new script parameters.
And that’s it! You have successfully updated your FileMaker add-on without losing your data!
Are you needing to incorporate add-ons into your FileMaker solution? We’re ready to help.