Streaming Audio and Video Once a Recording Begins
In the previous blog post in this series, we explained the process of streaming video and audio from surveillance cameras via FileMaker. In this post, we’ll cover the steps we took using FFmpeg to convert the downloaded video files and merge them into a single file.
FFmpeg is a free and open-source software project consisting of a suite of libraries and programs for handling video, audio, and other multimedia files and streams. At its core is the command-line FFmpeg tool itself, designed for processing of video and audio files. It is widely used for format transcoding, basic editing (trimming and concatenation), video scaling, video post-production effects, and standards compliance.
Wikipedia
MKV to MP4 Conversion
In the early stages of this project, it was evident that the MKV files from the Axis cameras would need to be converted into MP4 files. We knew we could call FFmpeg from FileMaker via command line, but that was about it. Building the command to convert the MKV to MP4 was relatively simple: define the input and the output, then put those into a string. As with most projects, it was the requirements before and after the video conversion that took the most time to figure out.
Downloading the File with BaseElements
Before we could define the input string, we had to download the MKV file from the camera. The Axis cameras store each recorded file with a recording UUID, so it was easy to retrieve the files using that value. When it comes to downloading, copying, or general file transporting, we typically rely on the BaseElements plugin which is easy to install and makes light work of these kinds of tasks.
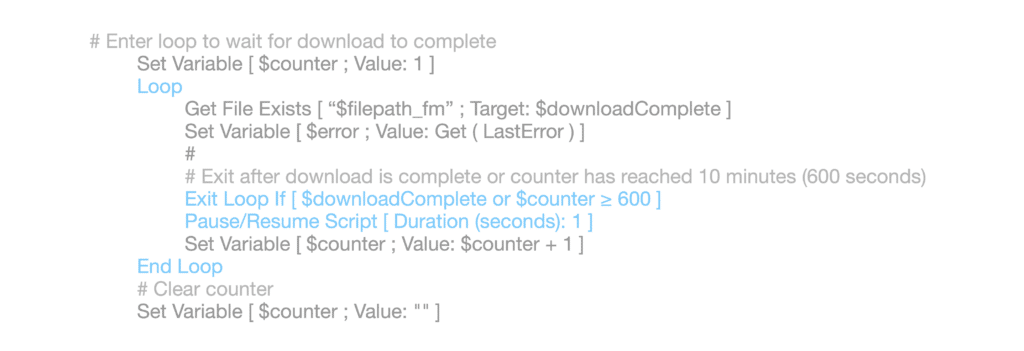
Checking Progress
After the download was initiated, FileMaker then had to wait for the OS to complete the download. Since the addition of Get File Exists in FileMaker 18, our go-to process for checking download progress in FileMaker is to enter a loop and periodically check the existence of the downloaded file. Since some of these videos can be pretty large, we added a 10-minute timeout to the loop.
Once the download is complete, we call upon the mighty library of FFmpeg to start the conversion process. It was at this step we discovered that in order to check progress we had to output a log file from FFmpeg, then periodically check that file until the conversion was complete or until it encountered any errors.
In Mac OS, the command string was simple:
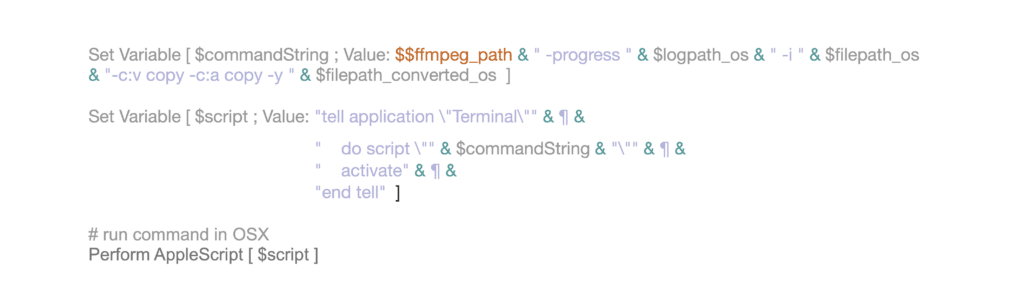
But in Windows we had to add some ASCII quotes into the string. (We’ll cover this aspect further in our upcoming fourth part of this series).

Progress=end
After the conversion process was started, the script then entered another loop to check FFmpeg’s log output. The process of checking the log output is rather rudimentary, but sufficient for this purpose. All it’s doing is checking for the existence of an error or checking for the “progress=end” at the last line of the log.
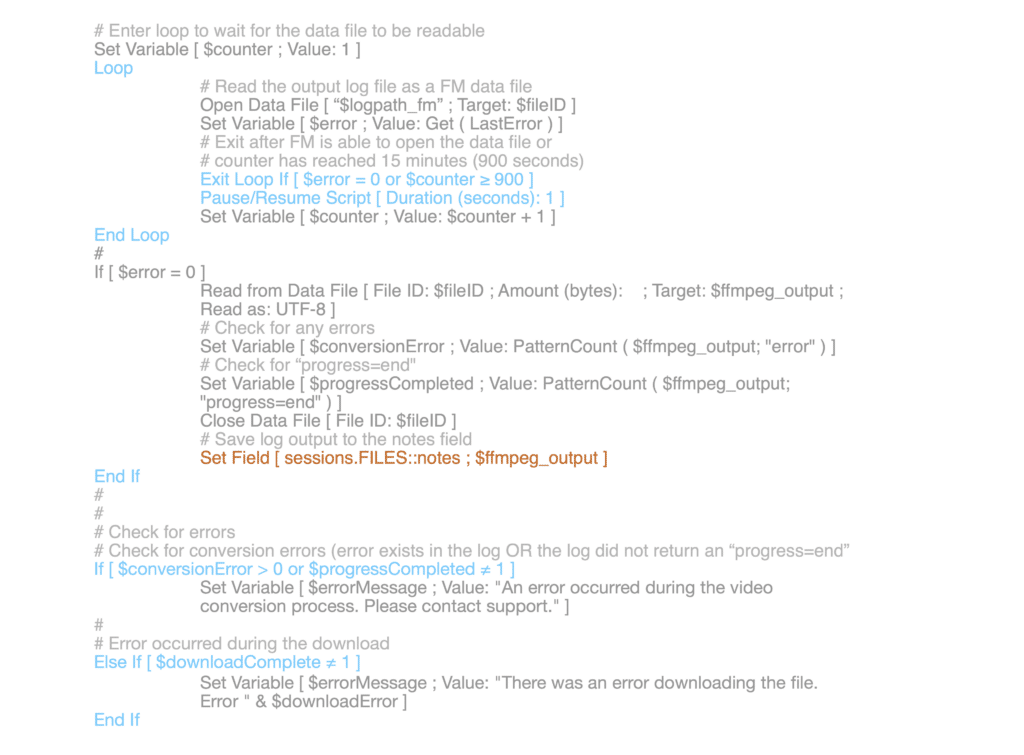
Once the conversion was successful, we could insert the newly created MP4 file into a FileMaker container field and then the MKV file could be deleted from the local user’s directory.
Using FFmpeg to Merge Videos
If you’ve made it this far in your reading, kudos! There’s a good amount of information up to this point! Our next step was to figure out how to take each converted MP4 and merge them into a single, grid-style video.
After emerging from the many documentation rabbit holes, we came across the FFmpeg Filtering Guide. The guide, paired with the FFmpeg Filter Documentation, really helped narrow down what we wanted to achieve and how we could do so. In this case, we discovered we needed to create a grid with each video using the “filter_complex” function, then use the hstack and vstack filters to input the videos into that grid.
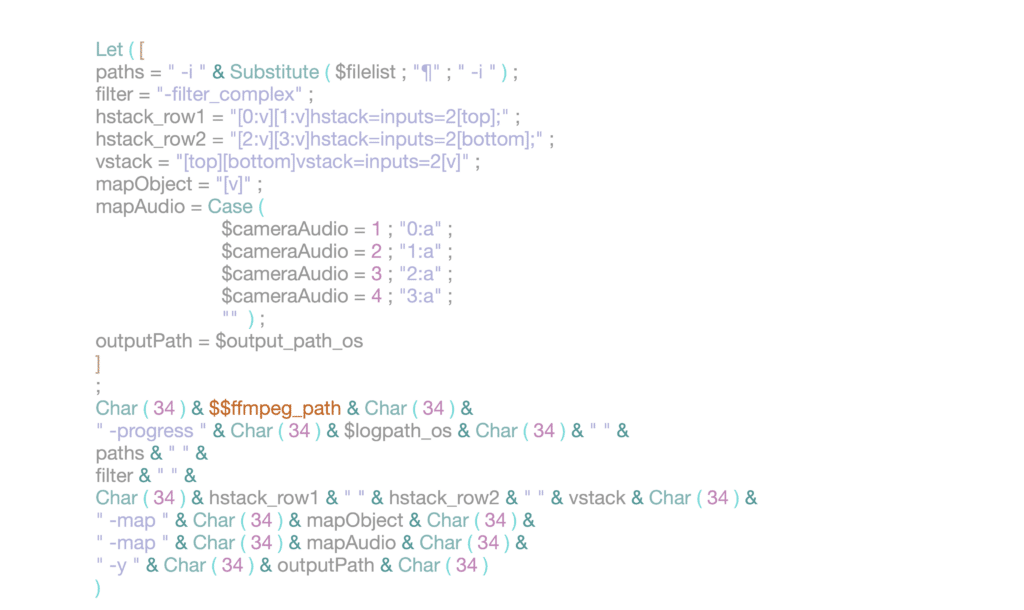
Here, we’re defining the first hstack row as the top of the grid, the second hstack as the bottom, then combining the two stacks into the vstack. The interface allows a user to select which camera to present in the final video, so we’re defining that with the mapAudio variable. Once the variables are all defined, everything is combined into a string, and that string is sent to FFmpeg.
Once the string is sent to FFmpeg, we’re checking its progress using the same method as before – checking log output for errors or for a “progress=end” pattern. And just like that, we have a grid-style video output of the camera recordings that matches the grid-style solution interface!
Stay Tuned for Part Four of Our FFmpeg Series
This post reviewed some of the steps we discovered to convert video files with FFmpeg. In our final post we’ll review some of the highs and lows, successes and failures, and lessons learned throughout the entirety of this project. Let us know what you think so far and what questions you have!
- PART 1: Capturing Live Video and Audio in FileMaker
- PART 2: The Process of Streaming Both Audio and Video From Select Cameras
- Part 4: Successes Found and Important Lessons Learned
Contact Us
Do you have a sticky problem that you’re trying to solve? We’re great at that. We prioritize simplicity and efficiency, but in smart ways – looking at an issue from lots of angles so we can consider various approaches. We can provide a robust solution that lasts the test of time, but that also has a straightforward framework for future maintenance and improvements. Send us a message below or schedule a 15-minute complimentary consultation.
About the Author
Joe Ranne is a Senior Application Developer at Portage Bay Solutions. Whether on a bicycle in a remote forest or 10 hours into a solution refactor, he always enjoys a good problem to solve.